In this lesson we will learn to simulate snow falling. This is based on Kirupa's snowfall technique.
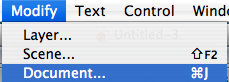
Step 1. After opening up a new Flash movie, from the Modify menu, select "Document".
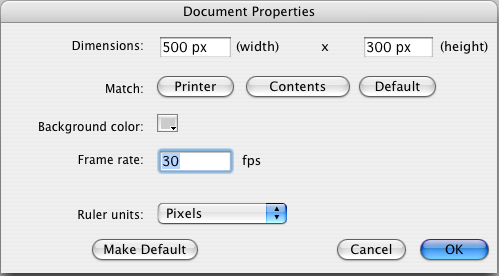
Step 2. Make your document/movie 500 pixels (px) wide by 300
pixels tall. Also, set the Frame Rate to 30.
You can also change the background color to something othr than white.
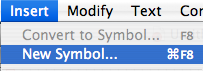
Step 3. From the Insert menu, select "New Symbol".
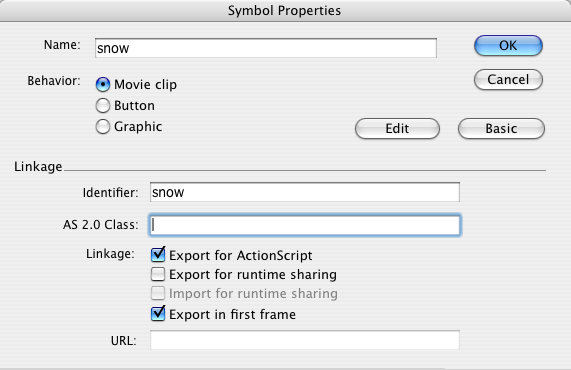
Step 4. Name it "snow" and make sure the radial button next to Movie clip is selected as a Behavior. Also, under Linkage, make sure it is set to Export for ActionScrip and Export in first frame, and that the Identifier is "snow".
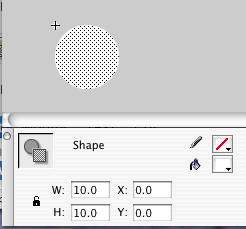
Step 5. You can either use the Oval Tool or the Pen Tool to create your snowflake. Here I am using a circle. I also set the x and y position of the circle to 0 and the height and width are both 10.
Step 6. Now navigate back to Scene 1. All that is left is to write the ActionScript.
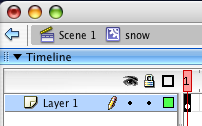
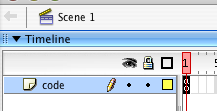
Step 7. In the timeline, change the name "Layer 1" to "code" and select the first frame on thi layer.
Step 8. Here is the code that will make everything work.
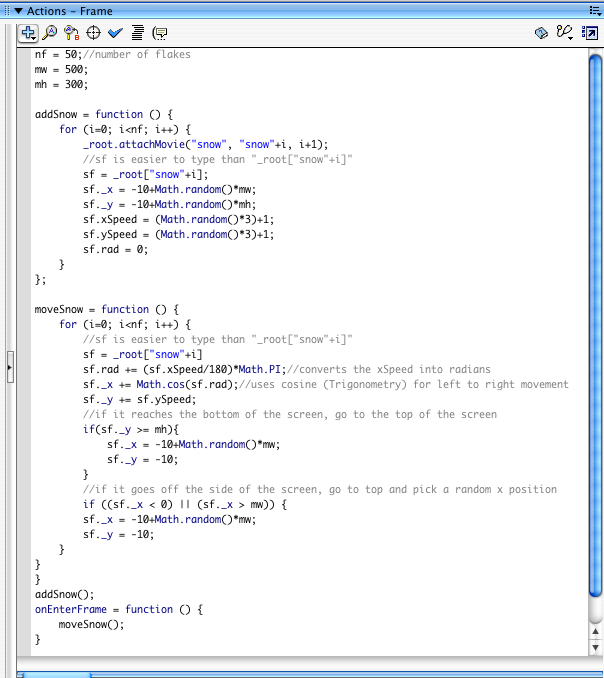
Here is the code in a format you can copy and paste.
Here is the code:
nf = 50;//number of flakes
mw = 500;
mh = 300;
addSnow = function () {
for (i=0; i<nf; i++) {
_root.attachMovie("snow", "snow"+i, i+1);
//sf is easier to type than "_root["snow"+i]"
sf = _root["snow"+i];
sf._x = -10+Math.random()*mw;
sf._y = -10+Math.random()*mh;
sf.xSpeed = (Math.random()*3)+1;
sf.ySpeed = (Math.random()*3)+1;
sf.rad = 0;
}
};
moveSnow = function () {
for (i=0; i<nf; i++) {
//sf is easier to type than "_root["snow"+i]"
sf = _root["snow"+i]
sf.rad += (sf.xSpeed/180)*Math.PI;//converts the xSpeed into radians
sf._x += Math.cos(sf.rad);//uses cosine (Trigonometry) for left to right movement
sf._y += sf.ySpeed;
//if it reaches the bottom of the screen, go to the top of the screen
if(sf._y >= mh){
sf._x = -10+Math.random()*mw;
sf._y = -10;
}
//if it goes off the side of the screen, go to top and pick a random x position
if ((sf._x < 0) || (sf._x > mw)) {
sf._x = -10+Math.random()*mw;
sf._y = -10;
}
}
}
addSnow();
onEnterFrame = function () {
moveSnow();
}
Here is the code explained:
nf = 50;//number of flakes
mw = 500;//the width of the movie
mh = 300;//the height of the movie
Now we need 2 functions, one to add the snow (from the Library), and another function to make all the snowflakes move. We use a "for loop" to assign an individual name to each flake, then we create a variable inside of that loop to reference the snowflake, basically a shortcut or abbreviation. Then we assign a random x and y position to each new snowflake. To control many snowflakes at once, we also use a "for loop". We tell each snowflake how to move, using cosine to direct it's horizontal movement, and the vertical movement uses a random number that we assigned to each snowflake in the addSnow function. Then we also set up some rules with an "if" statement, telling the snowflake, if it goes off the screen, go back to the top of the screen and pick a random x position to start from, but the y position will be 10 pixels above the viewable area/top of the movie. Special thanks to Kirupa for the use of cosine to create smooth horizontal movement. Near the bottom we call the addSnow function, then set the enterFrame to call moveSnow function 30 times per second. Remember to declare your functions before you call them.
The finished product:
You can download the source file here.